Using Lambda scripting to automatically cost-optimize on-demand AWS resource use
By: Henrique Paim | September 1, 2021 | Business solutions, data migration, developer tools, and Productivity tools
Using on-demand compute resources from Amazon Web Services (AWS) is a great way to optimize the infrastructure costs associated with your site or application.
To truly get the most financial benefit from on-demand AWS services, you need to terminate any resources you don’t need to be constantly available. Internal applications and processes often have dark windows, and throttling resource use during these times can cut your bill dramatically.
However, manually terminating and reactivating resources can be time-consuming – so much so that you can lose in staff hours what you save in AWS fees. Fortunately, you can use Amazon’s Lambda resource-management coding service to automatically create and destroy instances on a regular schedule.

Working 9-to-5 on a staging server
Let's say you have an AWS staging environment for an Linux instance, m5.xlarge, in Canada. The price per hour on an on-demand instance is $0.214. Leaving that instance running the whole month, you’ll have to pay about $160.
Now let’s assume the company works Monday to Friday, 9 a.m. to 5 p.m. So, you really only need the staging instance about 160 hours each month. Under these predictable parameters, we can just take down the machine when we are not using it and pay just $34.24 per month, a savings of about 80 percent.
A sample Lambda function for creating and destroying EC2 instances
To implement the scenario explained above, we have to:
- Create a Lambda function that will create an instance from an image every day, between Monday and Friday, at 9 a.m.
- Create another Lambda function that will destroy the created instance at 5 p.m.
- Configure a schedule for those functions.
To accomplish this, follow these steps to create an IAM policy and IAM role.
Create an IAM Policy
1. Go to the IAM dashboard and click "Policies" on the left menu.
2. Click on "Create policy".
3. Create an IAM policy using the JSON policy editor with the code below. Paste the following JSON policy into the policy editor.
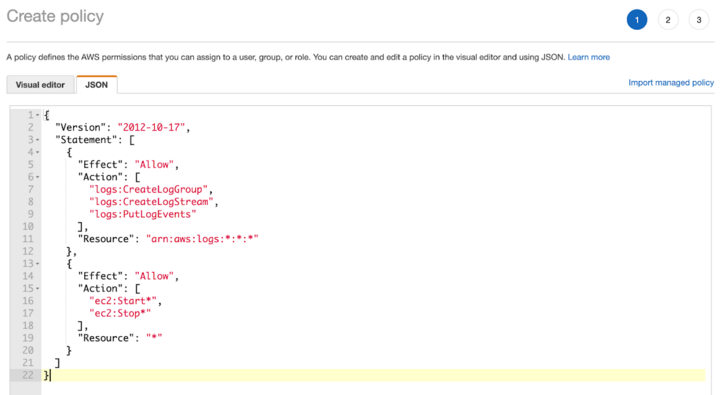
{
  "Version": "2012-10-17",
  "Statement": [
    {
      "Effect": "Allow",
      "Action": [
        "logs:CreateLogGroup",
        "logs:CreateLogStream",
        "logs:PutLogEvents"
      ],
      "Resource": "arn:aws:logs:*:*:*"
    },
    {
      "Effect": "Allow",
      "Action": [
        "ec2:Start*",
        "ec2:Stop*"
      ],
      "Resource": "*"
    }
  ]
}
4. Click on "Next: Tags" which is an optional step when creating an IAM policy. Click on "Next: Review" to proceed.
5. Give a new name to your new Policy and then click on "Create policy".

Congratulations! The screenshot below is your new IAM policy.

Create an IAM Role
- Go to the IAM dashboard and click "Roles" on the left menu.
- Click on "Create Role".
- Choose "AWS service" and "Lambda", meaning that your Role will be used by Lambda functions. Click on "Next: Permissions" to proceed.

4. Choose the Policy you created and click on "Next: Tags".

5. Add your optional tag and click on "Next: Review".

6. Give a name for your IAM Role and then "Create role".

Congratulations! The screenshot below is your new IAM Role.

Create two Lambda functions to stop and start your EC2 instances
- In the Lambda dashboard, click on Create function.
- Choose from scratch.
- Add the following values to the Basic Information section:
- Function name: StopEC2Instances. (This can be any name you want, of course.)
- Runtime: choose Python 3.7. You can choose any language if Python is not your forte.
- Permissions: Under Use an existing role choose the role you just created.
- Click on Create function.
- Paste this code under Function code. Use the code editor (lambda_function).
import boto3
region = 'ca-central-1'
instances = ['i-my-instance-code-here', 'i-my-other-instance-code-here']
def lambda_handler(event, context):
    ec2 = boto3.client('ec2', region_name=region)
    ec2.stop_instances(InstanceIds=instances)
    print('The instances "' + str(instances) + '" were stopped.')
This code stops one or more EC2 instances.
Note: For region, replace "ca-central-1" with the AWS Region where your instances are located. For instance, replace the example EC2 instance IDs with the IDs of the specific instances that you want to start and stop.
6. Under Basic settings, set Timeout to 10 seconds.
Note: Configure the Lambda function settings as needed for your case. For example, if you want to start and stop multiple instances, you might need a different value for Timeout, as well as Memory.
7. Choose Save.
8. Return to step 1 to create a new Lambda function, but this time it will start the EC2 instance. The name of the function can be StartEC2Instances.
9. Paste this code under Function code for the StartEC2Instances function.
import boto3 region = 'ca-central-1' instances = ['i-my-instance-code-here', 'i-my-other-instance-code-here'] def lambda_handler(event, context): ec2 = boto3.client('ec2', region_name=region) ec2.start_instances(InstanceIds=instances) print('The instances "' + str(instances) + '" were started.')
You can run a quick test by going to the Lambda Function list, choosing one of your new functions, and clicking on Test. If you were asked to inform an event name, give any name you want. You can choose the template Hello world since we are not using any input value.
Save the form and click on the Test button. The execution status is available at the top of the page.
Create the schedule rules
To schedule your automatic start and stop instance functions, follow these steps.
- From the CloudWatch page, go to Events and click on Rules.
- Click on Create Rule.
- Click on Schedule on the event source tab.
- You can choose between Fixed Rate or Cron expression. Just remember that this schedule will execute the function. To have our instances stopped at 5pm, you can choose this Cron expression "0 17 * * ? *"
- Click on Add target and choose one of the Lambda functions you created.
- Click on Configure details.
- Give any name you want to the schedule you are creating. For description, give any short description related to the schedule rule.
- Click on Create rule.
- Repeat the same steps to create a schedule for the second Lambda function.
Manage all your on-demand resources
The example we just walked through is for AWS EC2 instances, but it’s also applicable to any resource whose use can fit inside a schedule. This simple, one-time Lambda project can lead to substantial cost optimization savings.