Image aliases and filters in eZ Publish 5.4+
By: Thiago Campos Viana | October 22, 2015 | eZ Publish development tips, Imagine, alias, filter, and imagemagick
As of eZ Publish 5.4 / 2014.11, there is a new way to define custom image filters and image aliases. This is because image alias generation is now using LiipImagineBundle, with the underlying Imagine library from avalanche123. In this post we will review the old and new ways of configuring image aliases and filters along with a useful example.
We have created a sample bundle on GitHub, ImageFilterTutorialBundle, which is based on the shapecode/imagine-thumbnail-gravity-filter project. You can view the example code there in order to see it in the larger bundle context.
Let's suppose that we want to crop an image from its center. Prior to eZ Publish 5.4, we would start by defining a filter "gravity/center":
# ezpublish.yml
ezpublish:
    ...
    imagemagick:
    ...
        filters:
            gravity/center: '-gravity Center'
Then we could use this custom filter in any image alias / variation definition like this:
ezpublish:
    system:
        eng:
            image_variations:
                carousel_featured:
                    reference: ~
                    filters:
                       ....
                       - { name: gravity/center }
                       - { name: geometry/scaleheightdownonly, params: [300] }
                       - { name: geometry/crop, params: [ 590, 300 ] }
                        ....
You can no longer define custom filters with inline image conversion instructions, which are usually ImageMagick parameters. In the example above, "gravity/center" no longer works. However, "geometry/crop" still works because it is part of the native eZ 5.4+ image filters.
You can check the EzPublishCoreBundle image.yml file and see how the filters are defined now. If you are using any of those built-in filters you should still be OK. However, you'll need a completely different setup for your custom filters. Let's see how to do this for a similar "gravity center" example. You can see the MugoImageFilterTutorialBundle services.yml file; it defines a PHP class for the filter and maps that to the name "thumbnailgravityfilter/center":
parameters:
    mugo.image_alias.imagine.filter.loader.thumbnailgravityfilter.center.class: Mugo\ImageFilterTutorialBundle\Imagine\Filter\Loader\ThumbnailGravityCenterFilterLoader

services:
    mugo.image_alias.imagine.filter.loader.thumbnailgravityfilter.center:
        class: %mugo.image_alias.imagine.filter.loader.thumbnailgravityfilter.center.class%
        public: false
        tags:
            - { name: liip_imagine.filter.loader, loader: "thumbnailgravityfilter/center" }
You can check the PHP class ThumbnailGravityCenterFilterLoader.php to see how to extend the new eZ Publish image filter framework. The drawback is that what was a few characters of ImageMagick parameters directly in configuration files now requires potentially hundreds of lines of PHP code. Thankfully, many of the common but non-default filters can probably be adapted from code available in the community.
Now that everything is in place, we can define an image alias that uses the custom filter like this:
ezpublish:
    system:
        eng:
            image_variations:
                carousel_featured:
                    reference: ~
                    filters:
                        - { name: thumbnailgravityfilter/center, params: [590, 300] }
And with that all set, we can use it in an eZ Publish Twig template like this:
{% set featured_image_src = ez_image_alias(featured_image.content.getField('image'), featured_image.content.versionInfo, 'carousel_featured') %}
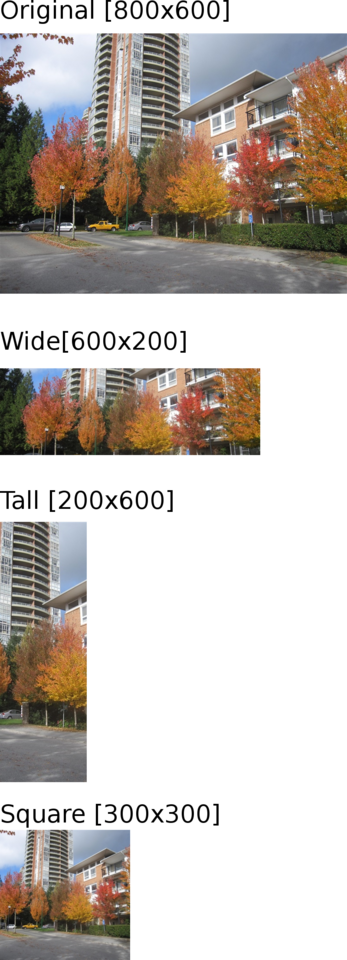
<img class="responsive" src="{{ featured_image_src.uri }}">This is a very useful filter for providing consistently sized thumbnails on a website. It combines the "gravity center" functionality, a resize, and a crop. It will scale the image down if the image is too big, or scale it up if the image is too small. Then it crops from the top and bottom or left and right as appropriate. In the image below you can see examples showing how the filter will work in different cases: the source images being on the left, and the resulting image alias on the right. It always produces a properly sized image, no matter what the size or dimensions of the source image.
Given this new implementation process, it would be nice to have some more built-in image filters in eZ Publish; currently we have "only" 14 filters. Or perhaps we could have a wrapper that would make it easier to extend and create custom filters similar to the old way by simply changing some configurations!