
Custom eZ Publish VAT handler: state- or province-based taxes
By: Peter Keung | July 13, 2010 | eZ Publish development tips
For us, the introduction of the HST in BC means more complex cross-province tax rules. For our software service judgmentcalculator.com we previously charged all Canadians 5% GST. Now we must charge our customers a different tax rate depending on the province that they live in. Thankfully, with eZ Publish as our webshop platform, we were able to quickly implement a custom VAT (value added taxes) handler.
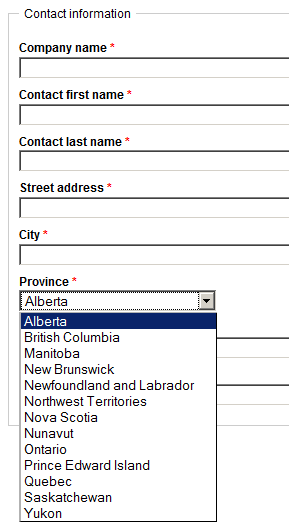
By default, eZ Publish VAT types are either fixed or dynamic based on the product category and the customer's country. In our case, we needed a mapping from the customer's province; the “province” attribute was already a required field in our registration screen (which populates a new User object).
While we could have re-purposed the Country datatype and swapped in a new attribute to user accounts, we figured that writing our own handler would minimize any disruption to the existing data structure and also allow us for more flexibility whenever tax rules change in the future. On the topic of creating your own VAT handler, the eZ Publish documentation is easy to follow and straightforward, so be sure to review it if you need some background information.
The steps to add our own tax handler can be broken down into a few simple steps.
INI settings
In extension/jc/settings/shop.ini.append.php, we added:
#?ini charset="utf-8"?

[VATSettings]
# These two settings will point eZ Publish to look for the handler at extension/jc/vathandlers/statebasedvathandlers.php
Handler=statebased
ExtensionDirectories[]=jc
# This would have needed to be an attribute of the Country datatype, so we won't use it
#UserCountryAttribute=state
RequireUserCountry=false
# This will be used in the Administration Interface when editing a product
DynamicVatTypeName=State-based GST/HST

[VATMappings]
# Used by StateBasedVATHandler
# Identifier of the state attribute in the User class
StateAttribute=province
DefaultVAT=12
# Mapping from province and territory to tax percentage
# For reference on Canadian tax rates: http://en.wikipedia.org/wiki/Sales_taxes_in_Canada
StateVATMapItems[]
StateVATMapItems[Alberta]=5
StateVATMapItems[British Columbia]=12
StateVATMapItems[Manitoba]=5
StateVATMapItems[New Brunswick]=13
StateVATMapItems[Newfoundland and Labrador]=13
StateVATMapItems[Northwest Territories]=5
StateVATMapItems[Nova Scotia]=15
StateVATMapItems[Nunavut]=5
StateVATMapItems[Ontario]=13
StateVATMapItems[Prince Edward Island]=5
StateVATMapItems[Quebec]=5
StateVATMapItems[Saskatchewan]=5
StateVATMapItems[Yukon]=5
VAT handler class
Our custom VAT handler sits at extension/jc/vathandlers/statebasedvathandler.php. The file name must have the name of the handler, followed by “vathandler”. Inside the file is the custom class, which must implement the function getVatPercent(). This function returns the percentage (out of 100) tax to be charged per product, according to the mapping specified previously in shop.ini. getVatPercent() is passed the product object in question (it runs for every product) and the country of the user, neither of which we actually use. However, the eZ Publish API enables us to easily get at the state information and mapping we need.
class StateBasedVATHandler
{
    function getVatPercent( $object, $country )
    {
        // We use neither the product object nor the country to determine VAT in this case
        // Instead, we determine VAT based on a specified user attribute for the state
        $shopINI = eZINI::instance( 'shop.ini' );
        $stateVATMapItems = $shopINI->variable( 'VATMappings', 'StateVATMapItems' );
        $stateAttribute = $shopINI->variable( 'VATMappings', 'StateAttribute' );
        // Default VAT should be your home state
        $defaultVAT = $shopINI->variable( 'VATMappings', 'DefaultVAT' );
        $percentage = $defaultVAT;

        // Get the value of the user's state and subsequently the VAT for that state
        $currentUser = eZUser::currentUser();
        $currentUserObject = $currentUser->contentObject();
        $dataMap = $currentUserObject->attribute( 'data_map' );

        // Some logic to get at the state / province name in an ezselection attribute
        if( isset( $dataMap[ $stateAttribute ] ) && 'ezselection' == $dataMap[ $stateAttribute ]->attribute( 'data_type_string' ) )
        {
            $selectionClassContent = $dataMap[ $stateAttribute ]->attribute( 'class_content' );
            $selectionOptions = $selectionClassContent[ 'options' ];
            $selectionID = $dataMap[ $stateAttribute ]->attribute( 'data_text' );
            $state = $selectionOptions[ $selectionID ][ 'name' ];
        }
        if ( isset( $stateVATMapItems[ $state ] ) )
        {
            $percentage = $stateVATMapItems[ $state ];
        }
        return $percentage;
    }
}
Implement the new VAT handler
Since we already had an existing extension, we didn't need to activate anything. We just regenerated the autoloads file (php bin/php/ezpgenerateautoloads -e -p), and cleared the INI cache.
Then, we edited each of our product objects and choose "State-based GST/HST" as the VAT type, instead of a fixed VAT rate.
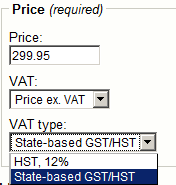
Now if you check out on our webshop and you're from Nova Scotia, you get charged 15% tax. If you're from Alberta, you pay 5% tax.
Extra considerations
- There are different shop account types in eZ Publish. Therefore, if you don't force users to create a normal user account before buying, you'll have to extend the code to test for something other than an object attribute.
- If you're using eZ Publish 4.3, remember that the Administration Interface Webshop tab is hidden by default! You can enable it by editing the "Tabs" setting under the "TopAdminMenu" block of menu.ini.append.php for your Administration Interface siteaccess.
- The code example we show assumes that your state/province attribute is of the ezselection datatype. If you're using a different datatype such as with the ghstate extension, just adjust the code to fetch the state name or ID as appropriate and update your custom INI settings as well. If you have multiple attributes for more complex logic, you can extend your code further or look at eZ Publish's default VAT rules interface as inspiration.
- For an overview of the various eZ Publish Webshop features, check the ez.no documentation or Chapter 15 of eZ Publish Advanced Content Management
