Using VirtualBox to install and test eZ Publish 5
By: Thiago Campos Viana | February 18, 2014 | eZ Publish development tips, install, virtual box, and ubuntu
Using virtual machines when developing eZ Publish websites have been useful in 2 main ways (if not more): working in a different server environment than your current machine and standardizing the dev environment for a team of developers. At the moment, I have Ubuntu 13.10 installed as my main operating system, and from time to time I need to work with some older eZ Publish versions that require PHP versions older than Ubuntu 13.10's default; in fact, the oldest eZ Publish version that I can run out of the box on Ubuntu 13.10 is eZ Publish 4.7. I don't like the idea of installing another OS just to work with an older eZ Publish version; that requires creating another partition, configuring grub, and so on. Using virtual machines enables me to work within another OS inside my main OS. That way I can work on a standardized environment specific to each client, while continuing to use my favorite base OS and tools. In this tutorial, I will describe how to install and configure Oracle VirtualBox to create virtual machines that run eZ Publish.
Download and install VirtualBox
VirtualBox supports Windows, Mac OS X, and Linux. You can download the appropriate package here. In our tutorial, we are using VirtualBox 4.3.6.
Download the installer for the virtual machine operating system
In this tutorial we are going to use Ubuntu Server 12.04 LTS for our virtual machine. The default repositories for this Ubuntu version use PHP 5.3.x, which allow us to work with all the eZ Publish releases from the 4.x series, but also even the current 5.x series.
VirtualBox setup
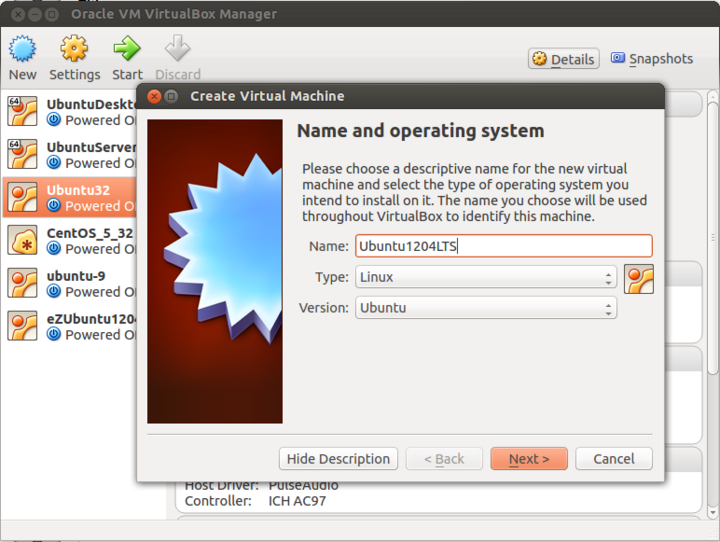
After starting VirtualBox and choosing to create a new virtual machine, select "Linux" as the "Type" and choose "Ubuntu" or "Ubuntu (64 bit)" as the "Version", depending on what is appropriate for your system.
On the next screen you are going to select the amount of memory to give the operating system. This depends of course on what site you are going to work on. 2 GB (2048 MB) is a safe value for most installs.
In the "Hard drive" screen, select "create a virtual hard drive now". Then, choose "VDI", which is the native VirtualBox format. Then, choose between a dynamically allocated and a fixed size hard drive one; I usually prefer the fixed size, but if you do not have much free space available, you can choose dynamically allocated. For an Ubuntu installation with 1 eZ Publish website, the bare minimum storage space required is about 2 or 3 GB, but this depends on the details of the site.
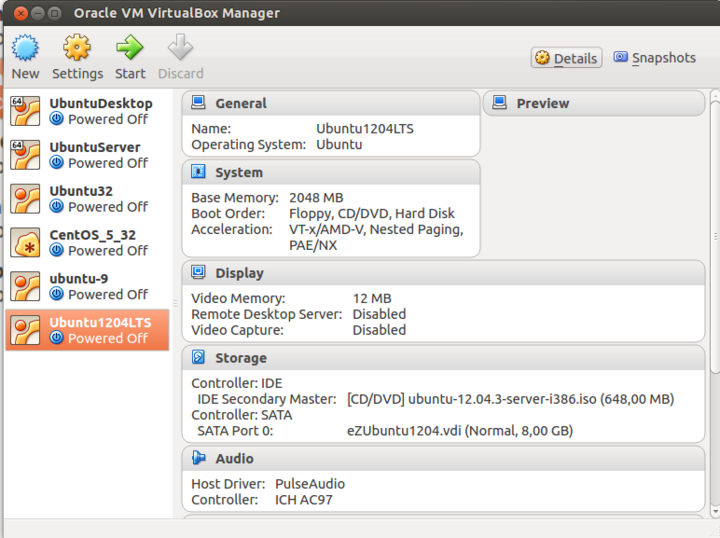
The virtual machine should now be created.
However, there are a few more details to configure. Select the new machine and click "Settings". Go to the "Network" tab and configure it as follows:
Attached to: Bridge Adapter
Name: eth0 (if you are using a cable); or wlan0 (if you are using a wireless network).
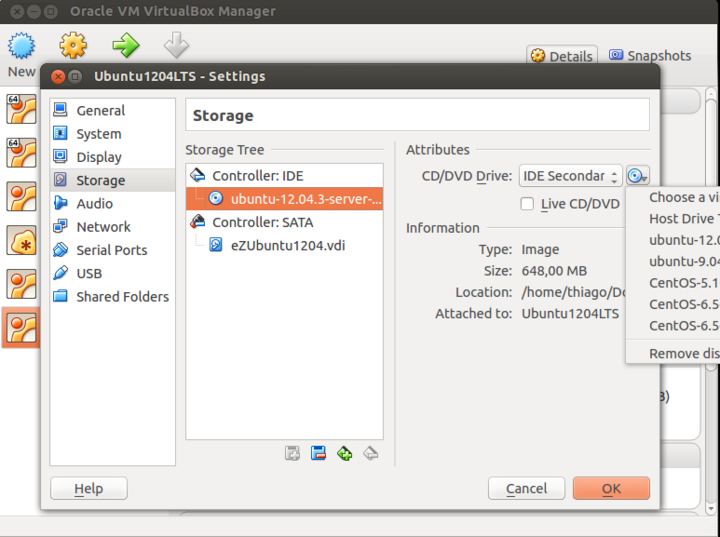
Then, configure the installation disk. Go to the "Storage" tab; in the "Controller: IDE" section, Click the icon for "Add CD/DVD Device". Then, click "Choose disk" and find the Ubuntu installer than you downloaded earlier.
Click "OK" to save the settings. Back on the main screen, click the "Start" button to boot your virtual machine and install the operation system. From there you can configure the operating system and install eZ Publish as per normal. If you have multiple developers, you can share your base virtual machines for a common dev environment.
Additional options
I have shown just a simple example here; you can easily use this tutorial as a base to install other Linux distributions or even a Windows or Mac virtual machine. You can also manage configurations and build powerful automated setups with tools such as Vagrant, Ansible, and PuPHPet.
Bonus: general setup notes for Ubuntu
If setting up a server is new to you, here are some notes on preparing a new eZ Publish install on a new Ubuntu 12.04 virtual machine.
Enable SSH connections:
Install OpenSSH via apt-get:
sudo apt-get update
sudo apt-get install openssh-server
sudo ufw allow 22
You can check the IP address of the virtual machine by typing:
ifconfig
Use the IP address to access the virtual machine from your base operating system using SSH and to open your eZ Publish installation in your browser.
Install MySQL, Apache, PHP, and Java
Install the necessary components via apt-get:
sudo apt-get install mysql-server mysql-client

sudo apt-get install apache2 apache2-doc apache2-mpm-prefork apache2-utils libexpat1 ssl-cert

sudo apt-get  install libapache2-mod-php5 php5 php-apc php5-intl php5-xsl php5-common php5-gd php5-curl  php5-dev  php5-idn php-pear php5-imagick php5-imap php5-mcrypt  php5-memcache  php5-mhash php5-ming php5-mysql php5-ps php5-pspell  php5-recode  php5-snmp php5-sqlite php5-tidy php5-xmlrpc php5-xsl  php5-cli  imagemagick php5-pgsql

# If you need to install Java for the eZ Find search engine
sudo apt-get install openjdk-6-jre
Enable Apache modules
sudo a2enmod ssl
sudo a2enmod rewrite
sudo a2enmod suexec
sudo a2enmod include
Configure the virtual host setup
Create /etc/apache2/sites-available/default and relevant virtual host settings for your version of eZ Publish.
Modify some key PHP.ini settings
On Ubuntu, the PHP settings are typically configured in /etc/php5/apache2/php.ini
Some key settings to modify include:
max_execution_time = 180
max_input_time = 180
memory_limit = 128
date.timezone = Your/Time_Zone
Install eZ Components
Use the pear installer:
sudo pear channel-discover components.ez.no
sudo pear install -a ezc/eZComponents
Restart Apache
sudo service apache2 restart
Create a MySQL database
Connect to MySQL, then run:
CREATE DATABASE dbname CHARACTER SET utf8 COLLATE utf8_unicode_ci;
CREATE USER 'dbuser'@'localhost' IDENTIFIED BY 'dbuserpass';
GRANT ALL PRIVILEGES ON dbname.* TO 'dbuser'@'localhost' WITH GRANT OPTION;
Install eZ Publish
We'll leave this part to the eZ Publish documentation, except for a note about file permissions. To avoid headaches with file permissions, I like to use Ubuntu ACL (you can install it using: sudo apt-get install acl).
A quick way to configure file permissions for eZ Publish:
find /path/to/ez -type d -exec chmod 775 {} \;

find /path/to/ez -type f -exec chmod 664 {} \;

chmod g+s /path/to/ez

setfacl -Rm u:www-data:rwx /path/to/ez
setfacl -Rm d:u:www-data:rwx /path/to/ez
setfacl -Rm u:yourUser:rwx /path/to/ez
setfacl -Rm d:u:yourUser:rwx /path/to/ez
Then you can access the virtual machine's eZ Publish installation by typing the IP address in your browser, or by adding a host name in your local hosts file and modifying the virtual host configuration accordingly.