
eZ Publish object edit interface customizations: browse mode and custom edit actions
By: Peter Keung | June 12, 2012 | User experience
Extensibility in eZ Publish is key, down to its object edit interface. This post explains a couple of the lesser documented edit features that you can extend: using browse mode in a custom datatype, and using a custom edit handler to add an edit action.
Browse mode in a custom datatype
Browse mode is used in a lot of places in eZ Publish, such as:
- Selecting a new location for an object
- Adding an object relation
- Embedding an object
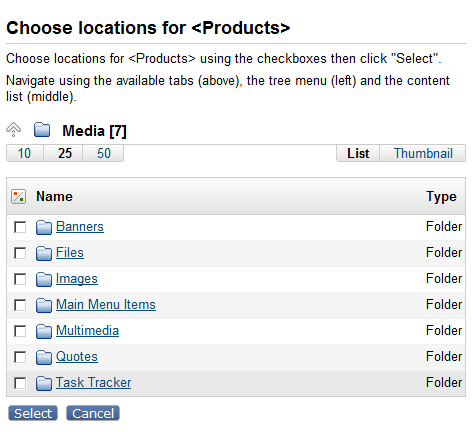
To invoke browse mode, you must use the eZContentBrowse class, specifically its "browse" method. There are different variations of browse mode, making use of its many options; for example, you can choose to return the selected node of object ID; you can allow multiple nodes to be selected; you can set the starting node; and more. Most, if not all, of these options are listed here.
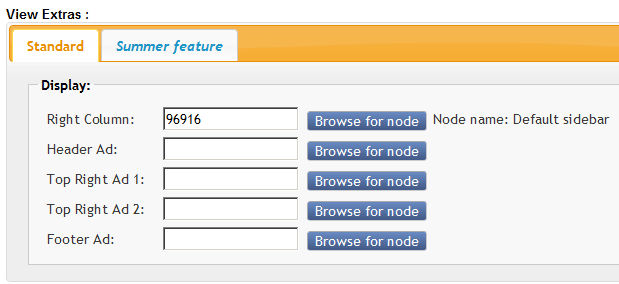
Our example case is a datatype that supports the selection of different nodes to fill various flexible spots on a page. This facilitates light-weight handling of pulling different ads or template elements based on the node tree, with overrides at the node or subtree level and also at the keyword level. Here, browse mode is used to select a single node at a time, returning its node ID.
There are three major parts to this implementation that relate to browse mode.
1. The edit template
extension/yourextension/design/standard/templates/content/datatype/edit/mugoviewextras.tpl
Note that this code is not the entire edit template, but represents only an individual "Browse for node" button.
<input class="button" type="submit" name="CustomActionButton[{$attribute.id}_browse_related_node][{$tag_id|wash()}][{$field_id|wash()}]" value="{'Browse for node'|i18n( 'design/standard/content/datatype' )}" />
{if ne( '', $field_value )}
    {set $selectedNode = fetch( 'content', 'node', hash( 'node_id', $field_value ) )}
    {if $selectedNode}
        Node name: {$selectedNode.name|wash()}
    {/if}
{/if}
The entire edit interface is one big form that posts to /content/edit, with a big "switch" statement to determine what you're trying to do based on what button you clicked. It is important to have your custom edit functionality be part of this process, so that all of the other normal edit functions get run as well when your button is clicked, such as saving changes made to other fields (before the days of ezautosave, at least!). In order to have our "Browse for node" buttons part of this process, they need to be named "CustomActionButton", with the attribute ID and the name of the action (which we'll identify later) as a key so that eZ Publish will know to process the action. The extra information provided ($tag_id and $field_id) is not specific to the eZ Publish framework, but specific to the datatype's needs for when we process it to determine from which field the "Browse for node" button was clicked.
2. The datatype
extension/yourextension/datatypes/mugoviewextras/mugoviewextrastype.php
Specifically, you need to implement the function customObjectAttributeHTTPAction in your datatype definition class to allow, basically, custom actions in edit mode.
There are two actions: one to trigger browse mode (which we'll call "browse_related_node") and one to process the returned result (and which we'll call "set_related_node").
function customObjectAttributeHTTPAction( $http, $action, $contentObjectAttribute, $parameters )
    {
        switch( $action )
        {
            case "browse_related_node":
            {
                $customActionButton = $http->postVariable( 'CustomActionButton' );
                $viewExtraCustomActionButton = $customActionButton[$contentObjectAttribute->attribute( 'id' ) . '_browse_related_node'];
                $tagID = key( $viewExtraCustomActionButton );
                $fieldID = key( $viewExtraCustomActionButton[$tagID] );

                $module = $parameters['module'];
                $redirectionURI = $parameters['current-redirection-uri'];

                $browseParameters = array(
                                           'action_name' =>  'AddRelatedNodeViewExtras'
                                          ,'browse_custom_action' =>  array( 'name' =>  'CustomActionButton[' . $contentObjectAttribute->attribute( 'id' ) . '_set_related_node]'
                                                                            , 'value' =>  $tagID . '|' . $fieldID )
                                           // If we don't set this, we will lose the attribute content when we return from browse mode
                                           , 'persistent_data' =>  array( 'HasObjectInput' =>  0 )
                                           , 'from_page' =>  $redirectionURI );
                eZContentBrowse::browse( $browseParameters,
                                         $module );
            } break;

            case "set_related_node":
            {
                if ( !$http->hasPostVariable( 'BrowseCancelButton' ) )
                {
                    // Find out which view extra field to update
                    $customActionButton = $http->postVariable( 'CustomActionButton' );
                    $values = $customActionButton[$contentObjectAttribute->attribute( 'id' ) . '_set_related_node'];
                    $valuesArray = explode( '|', $values );
                    list( $tagID, $fieldID ) = $valuesArray;

                    // Add the node as the view extra value
                    $selectedNodeIDArray = $http->postVariable( "SelectedNodeIDArray" );
                    $content = $contentObjectAttribute->attribute( 'content' );
                    if( $selectedNodeIDArray !== null )
                    {
                        // Only one node is allowed to be selected
                        $nodeID = $selectedNodeIDArray[0];
                        if ( !is_numeric( $nodeID ) )
                        {
                            eZDebug::writeError( "Related node ID (nodeID): '$nodeID', is not a numeric value.", __METHOD__ );
                            return;
                        }
                        $content[$tagID][$fieldID] = $nodeID;
                        $contentObjectAttribute->setContent( $content );
                        $contentObjectAttribute->store();
                    }
                }
            }
            default:
            {
                eZDebug::writeError( "Unknown custom HTTP action: " . $action, "eZObjectRelationType" );
            } break;
        }
    }
Some important things about "browse_related_node":
- The first few lines are there to extract the extra tag and field information (specific to the datatype)
- $browseParameters is where the magic happens:
- "action_name" maps to settings in browse.ini, explained later
- "browse_custom_action" defines the extra information that you want to be "posted" back to the edit interface once the user has selected the node. Notice how we have to force the tag ID and field ID information to persist, since by default all eZ Publish wants to give you is the attribute from which the action was triggered and the node the user selected. Notice also that we're telling it to post "CustomActionButton" with the action "set_related_node" in the same way that our edit template triggered "browse_related_node".
The "set_related_node" case should be self-explanatory in processing the result of the node selection; if you have any questions, feel free to leave a comment!
3. browse.ini:
extension/yourextension/settings/browse.ini.append.php
This is where eZContentBrowse will look up extra information to determine what type of browse mode you are triggering:
<?php /* #?ini charset="utf-8"?

[AddRelatedNodeViewExtras]
StartNode=content
SelectionType=single
ReturnType=NodeID

*/
?>
Custom edit handler
Another way to invoke a custom edit action, especially when you're not working in a custom datatype, is to use a custom edit handler. The best documentation on custom edit handlers is on Łukasz Serwatka's blog: see post 1 and post 2. Łukasz's examples show how to hook in your own code on object publish and also how to add some custom validation rules.
Here, we will add a custom button to an existing edit template in order to trigger a custom view for a specific use case. The custom view selects a video from an external video service, creates an eZ Publish object for that video, and then creates an object relation to that new video in the object that is being edited. For simplicity sake, we will only go through the code to trigger the custom view.
As with activating browse mode in a custom datatype, it is important to have your custom edit functionality be part of the eZ Publish editing framework, so that all of the other normal edit functions get run as well when your button is clicked, such as saving changes made to other fields (before the days of ezautosave, at least!).
Activating the custom edit handler requires only an INI setting and the handler class.
Our extension name is "mugo_video_browser". In extension/mugo_video_browser/settings/content.ini.append.php:
# Add a custom edit handler
[EditSettings]
ExtensionDirectories[]=mugo_video_browser
In extension/mugo_video_browser/content/mugo_video_browserhandler.php:
<?php
/*
* Custom edit action: adding a new listener based on a button "AddVideo" that will redirect to a custom video browser view
*/
class mugo_video_browserHandler extends eZContentObjectEditHandler
{

        function __construct()
        {
        }


        function fetchInput( $http, &$module, &$class, $object, &$version,
                             $contentObjectAttributes, $editVersion, $editLanguage, $fromLanguage )
        {
                if( $http->hasPostVariable( 'AddVideo' ) )
                {
                        // Using key in order to submit attribute ID - dummy loop
                        foreach( $http->postVariable( 'AddVideo' ) as $attributeID => $value )
                        {
                                $videoURL = '/mugovideo/browse/' .
                                            $object->attribute( 'id' ) . '/' .
                                            $version->attribute( 'version' ) . '/' .
                                            $attributeID;
                        }

                        if ( $module === null )
                        {
                                return $videoURL;
                        }
                        else
                        {
                                $module->redirectTo( $videoURL );
                                return $videoURL;
                        }
                }
        }

        static function storeActionList()
        {
                return array( 'AddVideo' );
        }
}
?>
Then, in an override template for editing the relevant attribute, just add a button named "AddVideo".
Have you used a custom edit handler for a different purpose? Share your experiences in the comments!
