Email authentication's time has come: implementing SPF, DKIM, and DMARC
By: Benjamin Kroll | April 11, 2024 | email and marketing
With Gmail and Yahoo now requiring bulk emailers to implement authentication protocols, making sure you understand the differences between SPF, DKIM, and DMARC and how they work together is essential for your email marketing efforts. We'll walk you through how to set these up in your email provider of choice.
Email is your business’s most important digital communication channel. You use it to market to customers, stay connected with team members, and build relationships with partners.
Email, when sent from a trusted source, builds your brand and your reputation.
And yet most businesses have been slow to implement authentication protocols that protect their email identity, even though security experts have been encouraging them to do so for the better part of a decade.
This apathy appears to be ending, however, with the recent news that two major email providers, Gmail and Yahoo, will require bulk email senders to implement the three major authentication protocols – SPF, DKIM, and DMARC – before their messages can land in users’ inboxes. The trade press responded with a wave of headlines about how the new rules will impact email marketers and businesses, and the general conclusion is – not much, if you are already a good actor and operate responsibly.
The three authentication standards are already supported by most email systems, and configuring them is simply a matter of a little forethought, planning, and system configuration. Here at Mugo Web, we’ve updated our internal productivity suite and some of our client’s email systems to meet (and, realistically, exceed) the three-protocol authentication standard. It’s a straightforward process, but it’s an important step in managing your business’s online reputation.
In this post, I will explain the three email authentication protocols (SPF, DKIM, and DMARC) and how they work together; review their importance for your business; and then explain the steps needed to set up authentication.
Email authentication fights spam, spoofing
Before we move on, let me stress that email authentication was developed as a way to combat spam, spoofing, and other malicious activity. It’s a system for confirming that an email is actually coming from the sender in the From: box and contains the intended information.
So, again, if you are a responsible email marketer, email authentication simply validates what you are already doing.
If you are a spammer, SPF, DKIM, and DMARC – when implemented properly – can really ruin your day.
So, how do the three protocols work?
Sender Policy Framework (SPF)
From a developer's mindset, SPF is the most basic of the authentication protocols. It effectively declares the IP addresses or domains of the email servers that are allowed to send mail on behalf of your domain.
It’s critical if you use a second-party service such as Mailchimp or Campaign Monitor to send email. In fact, most credible sites that send any form of mass email already have already implemented SPF as part of simply authenticating ownership of their domain with their mail service. Our recent update projects here at Mugo Web have been to add DKIM and DMARC authentication; SPF was already in place.
SPF policies are published as a TXT record to your domain’s DNS.
When the recipient’s mail system gets a message, it extracts the sending domain from the email header, and then checks the domain's DNS to ensure that the IP address of the transmitting server is whitelisted. If not, the message gets flagged as spam.
The DNS TXT record takes a format such as:
v=spf1 ip4:192.168.0.1 -all
Where v is the current protocol version (always spf1), the IP range declares eligible servers, and -all is a mechanism that details the pass/fail standards of the SPF test. I won’t go into all the possible permutations here. If you want to deep-dive into the nuts and bolts of these protocols, I’d suggest this great deep-dive at DMARCly – it’s the resource I’ve recommended to our own Mugo Web customers.
SPF can be quite effective on its own when implemented correctly. But unfortunately, it’s not always implemented properly.
As recently as 2022, a study found that only about 32% of the 1.5 billion domains surveyed had SPF records, and of those about 8 percent had bad syntax or outdated information. And a post at WeLiveSecurity does a great job of illustrating how a poorly implemented SPF record can be vulnerable to spoofing. An insurer carelessly declared a range of fully one-quarter of IPv4 addresses as eligible to send on their behalf, leaving the door pretty much open for anybody.
DomainKeys Identified Mail (DKIM)
DKIM is an asymmetric cryptography standard designed primarily to ensure that an email message has not been tampered with during the several hops it takes across the internet en route to the recipient.
When a message transmits, it is signed by the server with a private encryption key. The receiving server then checks the transmitting domain for the public matching key, which (like SPF) is published to the DNS header. You’ll often see it compared to an envelope that protects the email in transit.
Note, however, that unlike SPF, a DKIM record can be published as either a TXT or CNAME record to your DNS, depending on your mail system’s preferences (more on this in a moment).
The DKIM record can include a wide variety of tags, including body length limits, query methods, and even notes to human admins. (Again, I will defer to the DMARCly deep-dive to provide granular details.) It’s important to note that, unlike SPF, you will need to set up a unique DKIM record for every system you plan to send emails from.
Domain-based Message Authentication, Reporting & Conformance (DMARC)
DMARC essentially works in conjunction with SPF and DKIM to add hardened verification, problem handling, and reporting features to email authentication. In addition to requiring a mail to pass SPF or DKIM, DMARC also requires that at least one of the domains whitelisted by the other two be found in the From: header address. This is often referred to as “alignment” between SPF and DKIM and is the central point of DMARC’s additional security layer.
As with the other two protocols, it’s based on checking the email message header against the DNS of the host domain.
Perhaps most significantly, DMARC allows you to set a policy on what to do with a mail if it fails to validate: nothing, report, or quarantine. (This is a critical aspect of your implementation that we’ll get back to in a bit).
Market pressure to implement email authentication (finally)
So now that we’ve covered the basics of SPF, DKIM and DMARC, let’s look at how changes at big email providers like Gmail will likely impact your business. (Spoiler: Not much, aside from a little project management and less chance that your own inbox won’t be flooded with spam.)
Google and Yahoo are going to require SPF, DKIM, and DMARC for any sender that transmits more than 5,000 emails a day. That may sound like a lot, but if you are running on a single domain with 100 employees, that's 50 emails each, assuming that you aren’t also using your domain as the From sender for a weekly newsletter on any given day.
So, for essentially any business, it’s a good idea to go ahead and implement the full range of authentication standards now, just to have the baseline in place. It can’t hurt, and really can only help protect you from bad actors.
In fact, the industry has been pushing for comprehensive email authentication for years now. This piece at CSO from five years ago runs through the basics of SPF, DKIM, and DMARC (which were already five years old at the time) and encourages everybody to get on board. And email marketers now say they are actually kind of excited that Google & Co. are pushing for the change – in fact, you are likely to see more legitimate marketing emails when spam is finally tapped down.
Implementing email authentication
So, email authentication’s day is finally here (probably). Now, how do you go about implementing it for your own business? The involved steps are fairly intuitive for a system admin. The real issue is making sure the information you use to define the protocols is correct.
I recently updated our own email authentication for Google Workspace, as well as both marketing and productivity mail for a customer. The concepts and steps I’ll walk through here are intuitive enough that a tech-savvy DIYer should be able to handle the process. But, if you are working with a managed hosting and development partner (that’s our model here at Mugo Web, and it works), just contact them and say you want to enhance your email security. They will take it from there.
Identify all your mail servers
The first step in your email authentication project is to carefully catalog every system that sends emails, or that you want to send emails, under your domain(s).
This may sound like a no-brainer, but companies send a lot of emails from a lot of different platforms.
These systems may include your:
- Office productivity suite (Google Workspace, Microsoft 365)
- Main website CMS (WordPress, etc.)
- CRM (HubSpot, Zoho, Salesforce)
- Email marketing platform (Mailchimp, Constant Contact)
- eCommerce system (Shopify, WooCommerce)
- Polling and interactivity tools
- Amazon Web Services and any number of cloud services
As you can see, that’s a lot of mail servers. Not including any of them in your SPF declaration or DKIM record can lead to delivery issues and reputation damage, which are only amplified after you implement a DMARC policy.
So, a careful audit of every mail server that sends on your behalf is your first critical step. You also should consolidate some mail functions, when possible, through a single service, just to cut down on complexity.
Create your SPF and DKIM records
The process for creating SPF and DKIM records are similar, but since DKIM’s encryption keys are generated by the transmitting mail server, you will need to get some information from it first for that protocol.
SPF
The key here is to simply choose the parameters and mechanisms you want to include in the SPF TXT record you will eventually publish to your DNS. (Once more, I’ll defer to DMARCly for all the details. Or this primer is also a great resource on SPF syntax questions.)
SPF records typically take the form:
v=spf1 ip4:192.168.0.1 -all
Where v is the protocol version (always spf1); ipx identifies the address/address range of the whitelisted servers; and -all is one of the numerous mechanisms that determine pass/fail criteria.
DKIM
The first step here is to open your email system’s Admin panel and go to the Authentication section. Tell the system the domain you want to authenticate, and it will generate the IDs of the encryption key pairs that you will need to add to your site’s DNS.
Typically, your mail system will generate the values you will need to copy and paste into your host’s DNS panel, as well as ask you to perform a simple confirmation task. The DMARCly walkthrough we are touting illustrates the process in SendGrid; this help resource walks through the process at Mailchimp. (Note that both services generate their records as CNAME.) And, for good measure, here’s the process for Google Workspace, which I set up for our team here at Mugo Web.
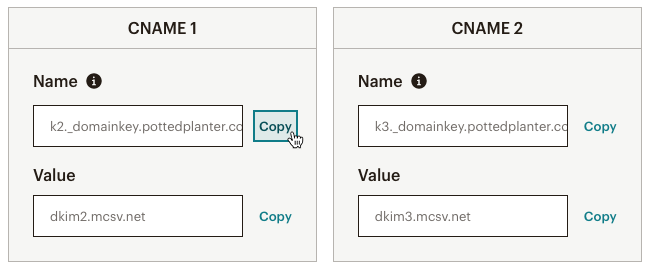
Most mail services, including Mailchimp (pictured here), will generate the DKIM record values you need to update your domain DNS.
The process varies from platform to platform, but the general workflow is the same. By the end of the process, you’ll have the records you need to update your host DNS.
Deciding your DMARC policy
When implementing DMARC, your big decision is about what you want the server to do if an email fails.
Your options are defined by the p variable in the DNS policy statement, as follows:
v=DMARC1; p=none; rua=mailto:exampleadmin@mugo.ca;
Your options for p are none, reject, or quarantine.
In recent projects here at Mugo Web, both for our own Google Workspace account and a client of our ReaderBound platform, I’ve elected to keep the p value as none, meaning that DMARC will take no action except to report the failure at the email listed for the rua parameter. Note: SPF or DKIM will act independently for a specific failure against their tests, so obvious spoofs won’t get through. The DMARC p variable dictates responses to failures against the hardened, cross-checking authentication that the additional protocol provides.
I think this is the best approach at this point until we have a chance to further evaluate the best strategy for handling DMARC failures – get the protocol active and in place on your systems, and then go back to set/revise your policy based on careful evaluation of use cases.
There are numerous third-party wizards out there to help you configure your DMARC policy – not surprisingly, DMARCly is one of them, and Mailchimp’s Authentication dashboard offers similar functionality. But in the near term, you can simply use a record in the simple format we’ve shown above, particularly if you are going with p=none for the time being.
Updating your domain DNS
Now that you’ve determined your preferred email authentication policies, it’s time to configure your domain’s DNS to include the TXT or CNAME records that help mail recipients confirm that you are actually sending the message.
Note that you will need to publish each record – SPF, DKIM, and DMARC – independently. Additionally, you will need to have published SPF and DKIM records before you can publish and test a DMARC policy.
For most hosting services, the interface for publishing a DNS record is pretty straightforward.
- Go the DNS area of your admin panel
- Click Add
- Select the your desired record attributes
- Paste in your SPF, DKIM or DMARC record values
- Publish your record
Here’s how the process is laid out in Cloudflare, the service we often use to manage DNS here at Mugo Web. Note that in this case, the DKIM record is in TXT format.
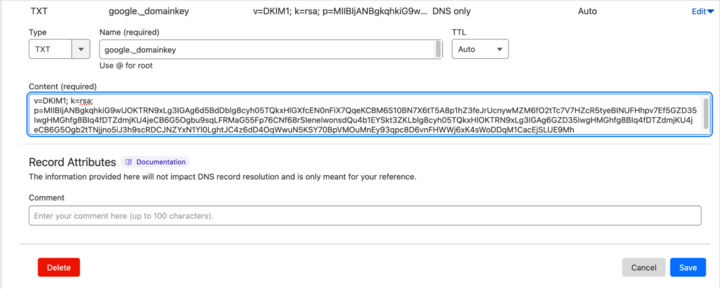
It may take a couple of hours (or longer) for the changes to propagate.
Email authentication is really a no-brainer
I believe this post illustrates the benefits of email authentication and that when planned and implemented properly, there is no downside for your business. It’s just a matter of a little planning and some configuration tasks, and your online reputation will be far more secure.