Editing CSS/JS in Google Chrome
By: Ernesto Buenrostro | September 28, 2018 | Front-end development and Productivity tools
How many times have you found yourself editing and tuning up CSS or JavaScript code right in the browser, then refreshing the page only to lose all of your changes? Improving development workflows can help web developers to be more efficient and deliver a higher quality final product.
The web browser plays an important role in many web development workflows; editing HTML, JS, and CSS files is often a part of daily tasks. If the main browser you are using is Google Chrome, you can take advantage of “Workspaces”, which is a feature of Chrome's DevTools, to make your development workflow more efficient. Here's how.
To enable the feature on a site, follow the steps below:
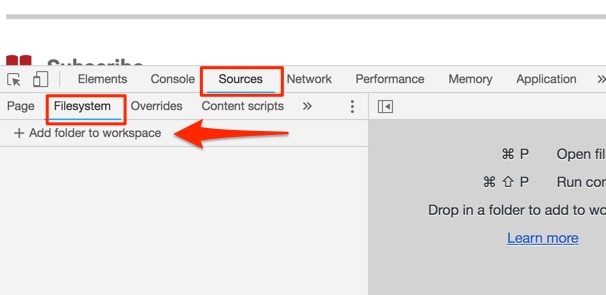
- Open your Chrome DevTools.
- Click on the “Sources” panel.
- Then, click on the “Filesystem” panel.
- Finally, click on “Add folder to workspace.”
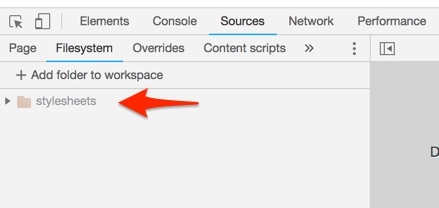
- Chrome will open a window to let you choose the directory with the source files. It is important that the directory you choose matches the path of the files on your web page (for example: if your page is loading the following CSS file <link href="/extension/design/front-end/stylesheets/styles.css" rel="stylesheet">, you need to link the extension directory; not only the stylesheets directory.)
After linking the directory with the source code, Google Chrome will ask for permission to link the directory to the current page. Click "Allow".

When you have granted the web page access to the directory, it will be listed in the “Filesystem” panel. The files used by your web page will also be bound to the files on your file system.
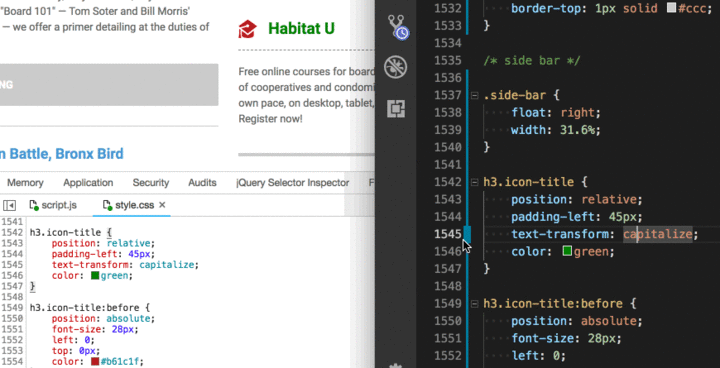
Selecting an HTML element in the Google Chrome DevTools “Elements” tab will show the CSS that has been applied to it. Also, you will see a green dot next to the file name, which means that the file has been bound to the file in your file system.

Clicking on the “style.css” link will take you to the line of CSS code in the “Sources” panel.
Making changes to the file in the Sources panel and pressing cmd + s on a Mac or ctrl + s in Windows will save the changes to your file system and will apply the changes to the web page.
This is a good improvement to the development workflow because you don’t need to refresh and wait until the page is rendered again; you can see and save the changes immediately.