Building a custom REST API to synchronize content in eZ Publish
By: Carlos Mauri | November 3, 2017 | eZ Publish development tips and Web solutions
eZ Publish allows you to develop custom REST APIs to transfer data among different platforms. This "getting started" guide will show you how to build and integrate a REST API into an eZ Publish installation by developing a custom module view that returns a JSON object.
What is a REST API?
REST, also known as a REpresentational State Transfer, is an architectural style for designing networking applications. A REST system follows six constraints that define how a server may process and respond to a client request, or, in other words, how one system can communicate with another. REST APIs are usually defined by:
- a URL endpoint path that usually contains many different sub-paths and/or query parameters
- a media type, typically an XML or JSON object
- a standard HTTP method like GET or POST
Define your scenario
What are you trying to achieve? What are your project requirements? Maybe you need to sync content from your site to a mobile app, or build an e-mail marketing solution that is set up to pull content from your CMS. Or perhaps your e-commerce platform needs access to product information that is primarily stored in the CMS. In our example case, we needed to sync content daily between multiple eZ Publish installs, so having our own REST API became a good solution.
Let's code
We'll follow a recently implemented solution where we had to provide content (documentation) from a main server to several web clients. If you don't have experience developing with eZ, we recommend you read the eZ technical manual first.
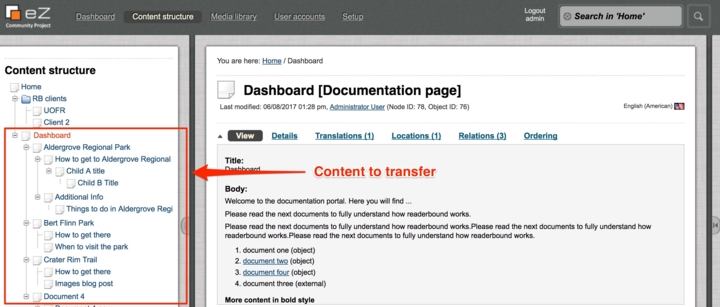
Our approach was to create a custom module view. If needed, you can also create an extension or just place the new module into an existing one. Create a new folder within your extension's modules folder named support_portal. Under support_portal create a new module.php file and paste the following code:
<?php
$module = array( 'name' => 'support_portal' ); //module's name

$ViewList = array();
// defining get_documentation view
$ViewList['get_documentation'] = array(
     'functions' => array( 'get_documentation' ),
     'script' => 'get_documentation.php',
     'params' => array( 'client_token' )
);
// setting user permissions required by our module:
$FunctionList = array();
$FunctionList['get_documentation'] = array();
?>
The module name, the view name, and the params will define your REST API URL, in this case:
http://myserverdomain/support_portal/get_documentation/param1
The next step is building the view. Create a new get_documentation.php file under the support_portal folder and add the following PHP script:
<?php
// View code sample

eZDebug::updateSettings(array( "debug-enabled" => false, "debug-by-ip" => false ));
//get view parameters
$token = $Params['client_token'];
//getting ini values
$supportINI = eZINI::instance( 'support_portal.ini' );
$ClientParentNode = $supportINI->variable( 'GeneralSetting', 'ClientParentNodeID' );
$DocumentParentNodeID = $supportINI->variable( 'GeneralSetting', 'DocumentParentNodeID' );
$LogFileName = $supportINI->variable( 'GeneralSetting', 'logFileName' );

eZLog::write( 'Initializing script - REST API called by client ['.$token.']' , $LogFileName ) ;

if (isset($token))
{
   $documentArray = supportPortalRB::createArray( $token, $ClientParentNode, $DocumentParentNodeID, $LogFileName );
}
else
{
   $documentArray = array(
      'response' => 'error',
      'view' => 'get_documentation',
      'errorMessage' => 'Undefined Token'
   );
   eZLog::write( 'API call error. Undefined token.' , $LogFileName ) ;
}

eZLog::write( 'Sending array as a JSON object.' , $LogFileName ) ;

$jsonOBJ = json_encode($documentArray);
$Result = array();
$Result['path'] = array();
$Result['content'] = $jsonOBJ;
$Result['pagelayout'] = false;
eZLog::write( 'Ending script execution.' , $LogFileName ) ;
This view is responsible for building and sending the REST API media type which is, according to the code above, a JSON object. Some considerations about the get_documentation.php script include:
- supportPortalRB::createArray is a public class method that generates all the content by building a multidimensional array several levels deep. It can be as complex as you want and we are not going to look into it, so you can change this line to use your own function or just provide a temporary array of values for testing purposes.
- It's important to make sure eZ Debug is off - it is usually active in dev environments. To do that you can use eZDebug::updateSettings. eZ Debug outputs content at the bottom of every HTTP response and would thus break any script that parses it. Don't forget to disable the pagelayout by setting it to false.
- Use eZLog::write to generate logs that will help you find upcoming issues.
- We like to use INI files and eZINI to store variables such nodes IDs and file names.
- Consider using tokens to protect your content. That way you'll be sure to use only those systems providing the right token to get the information. For this demo code we are using a simple client token and checking whether the provided token matches.
- Using the json_encode() function you can easily transform an array into a JSON object.
Also include the module in your extension by editing your_extension/settings/module.ini.append.php:
<?php /* #?ini charset="utf-8"?

[ModuleSettings]
ExtensionRepositories[]=your_extension_name
ModuleList[]=support_portal

*/ ?>
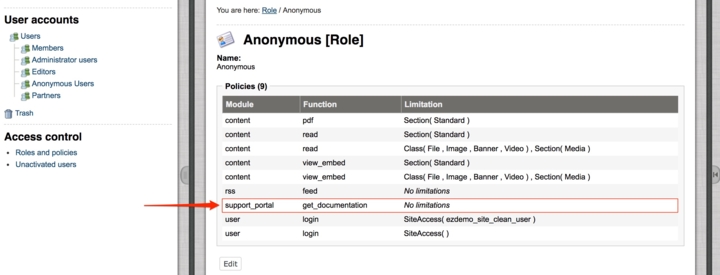
Last but not least, add a new policy to make the view public, otherwise you won't have permission to access the REST API.
Once you have completed all the steps above don't forget to clear the eZ cache.
php bin/php/ezcache.php --clear-all
NOTE: If you are familiar with eZ Publish you have probably realized that we've basically built a module view that returns a JSON object!
The result
Your basic REST API is now ready to go! Open a new browser window and type:
http://your.server.name/support_portal/get_documentation/token
You should be able to see the module view result, or in other words, the JSON object itself.
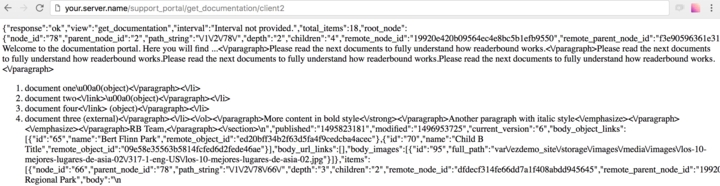
The example shown expects a simple GET request to the URL.
As mentioned above, this post is a basic intro to building your own REST API, but it did not cover the following aspects:
- any parameter querying of data
- multiple endpoint paths
- different formatting of data depending on the request
- documentation to help API users understand how to retrieve the data and what to expect as return formats
Interested in learning more about how Mugo can help you? Reach out to discuss your specific needs. We’re happy to chat anytime!