Adding complex fields to WordPress custom post types
By: Mo Ismailzai | March 27, 2019 | Business solutions and Web solutions
With the release of the new Gutenberg editor in 2018, WordPress alienated some users but continues to lead in the CMS space, currently at a peak of 60% market share. Though most of our clients are on enterprise platforms like eZ Platform, some continue to run complex websites with WordPress. In this post, we'll peek under the hood to see how WordPress handles content classes and field types and we'll use that knowledge to add complex field types of our own.
WordPress post types under the hood
A fresh installation of WordPress produces the below MySQL table structure:
+-----------------------+
| Tables_in_wordpress   |
+-----------------------+
| wp_commentmeta        |
| wp_comments           |
| wp_links              |
| wp_options            |
| wp_postmeta           |
| wp_posts              |
| wp_term_relationships |
| wp_term_taxonomy      |
| wp_termmeta           |
| wp_terms              |
| wp_usermeta           |
| wp_users              |
+-----------------------+
In WordPress, content classes are referred to as posts and are stored in the wp_posts table. WordPress has five internal post types called post, page, attachment, revision, and nav_menu_item.
A fresh install of WordPress will always have a similar row in wp_posts:
                   ID: 1
          post_author: 1
            post_date: 2019-03-14 17:51:03
        post_date_gmt: 2019-03-14 17:51:03
         post_content: <!-- wp:paragraph -->
<p>Welcome to WordPress. This is your first post. Edit or delete it, then start writing!</p>
<!-- /wp:paragraph -->
           post_title: Hello world!
         post_excerpt:
          post_status: publish
       comment_status: open
          ping_status: open
        post_password:
            post_name: hello-world
              to_ping:
               pinged:
        post_modified: 2019-03-14 17:51:03
    post_modified_gmt: 2019-03-14 17:51:03
post_content_filtered:
          post_parent: 0
                 guid: http://dev.local/?p=1
           menu_order: 0
            post_type: post
       post_mime_type:
        comment_count: 1
And if we modify the default post and save our results, we'll see a similar new row in wp_posts. Note that this row's post_parent is now set to the ID of the original row and the post_type is now revision instead of post:
                   ID: 5
          post_author: 1
            post_date: 2019-03-14 17:52:48
        post_date_gmt: 2019-03-14 17:52:48
         post_content: <!-- wp:paragraph -->
<p>Welcome to WordPress. This is your first post. Edit or delete it, then start writing! First edit.</p>
<!-- /wp:paragraph -->
           post_title: Hello world!
         post_excerpt:
          post_status: inherit
       comment_status: closed
          ping_status: closed
        post_password:
            post_name: 1-revision-v1
              to_ping:
               pinged:
        post_modified: 2019-03-14 17:52:48
    post_modified_gmt: 2019-03-14 17:52:48
post_content_filtered:
          post_parent: 1
                 guid: http://dev.local/2019/03/14/1-revision-v1/
           menu_order: 0
            post_type: revision
       post_mime_type:
        comment_count: 0
In addition to the predefined post types, WordPress allows us to create Custom Post Types by adding a trivial amount of code in our theme's functions.php file or in a plugin:
function create_post_type() {
register_post_type( 'acme_product',
array(
'labels' => array(
'name' => __( 'Products' ),
'singular_name' => __( 'Product' )
),
'public' => true,
'has_archive' => true,
'supports' => array( 'title', 'editor', 'custom-fields' )
)
);
}
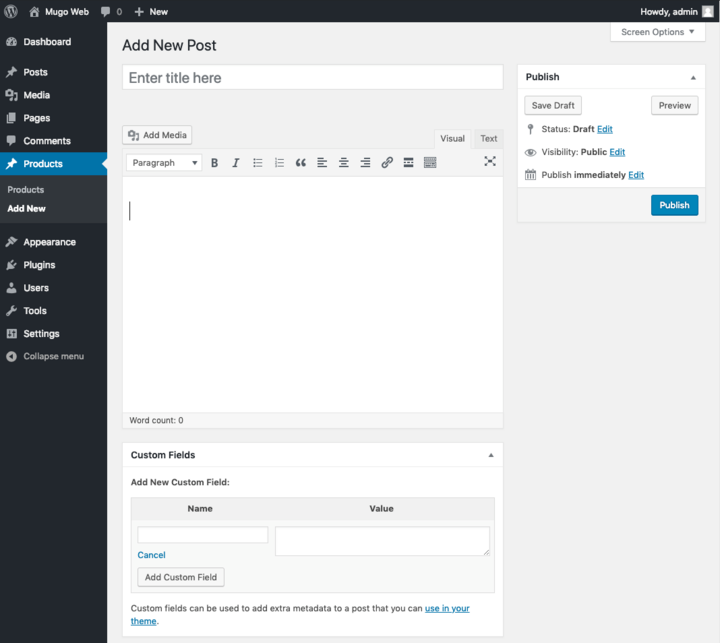
add_action( 'init', 'create_post_type' );The above code creates a new section to the main navigation area of the WordPress administration screen and our custom post type inherits many of the default post type's fields. In addition, because we included custom-fields in the function above, the post screen also allows us to add Custom Fields in the form of key-value combinations.
But if we've gone to the trouble of creating a custom post type, chances are that we want attributes that are not present on the main post type. So how can we define custom attributes (or in the parlance of WordPress, custom fields) for this new content class (or in the parlance of WordPress, custom post type)?
Let's peek under the hood to see how WordPress does it internally, using the default post type and the Featured Image field as an example.
Although the edit post screen allows us to configure many post-related settings, such as the Featured Image, these data are not stored directly in the post's wp_posts table row. When we add a new Featured Image for example, we trigger two actions.
First, because the Featured Image uploads an attachment, and because WordPress treats attachments as posts in the wp_posts table, adding a Featured Image creates a new wp_posts row, with the post_type set to attachment:
                   ID: 6
          post_author: 1
            post_date: 2019-03-14 17:58:32
        post_date_gmt: 2019-03-14 17:58:32
         post_content:
           post_title: WordPress
         post_excerpt:
          post_status: inherit
       comment_status: open
          ping_status: closed
        post_password:
            post_name: wordpress
              to_ping:
               pinged:
        post_modified: 2019-03-14 17:58:32
    post_modified_gmt: 2019-03-14 17:58:32
post_content_filtered:
          post_parent: 1
                 guid: http://dev.local/wp-content/uploads/2019/03/WordPress.png
           menu_order: 0
            post_type: attachment
       post_mime_type: image/png
        comment_count: 0
Second, in order to relate this attachment with the post on which it was uploaded, WordPress makes two entries in the wp_postmeta table. The first has a meta_key of _wp_attached_file and the other has a meta_key of _wp_attachment_metadata -- both are associated with the ID of the original post's wp_posts row, through the post_id field:
   meta_id: 6
   post_id: 6
  meta_key: _wp_attached_file
meta_value: 2019/03/WordPress.png
   meta_id: 7
   post_id: 6
  meta_key: _wp_attachment_metadata
meta_value: a:5:{s:5:"width";i:1000;s:6:"height";i:1000;s:4:"file";s:21:"2019/03/WordPress.png";s:5:"sizes";a:3:{s:9:"thumbnail";a:4:{s:4:"file";s:21:"WordPress-150x150.png";s:5:"width";i:150;s:6:"height";i:150;s:9:"mime-type";s:9:"image/png";}s:6:"medium";a:4:{s:4:"file";s:21:"WordPress-300x300.png";s:5:"width";i:300;s:6:"height";i:300;s:9:"mime-type";s:9:"image/png";}s:12:"medium_large";a:4:{s:4:"file";s:21:"WordPress-768x768.png";s:5:"width";i:768;s:6:"height";i:768;s:9:"mime-type";s:9:"image/png";}}s:10:"image_meta";a:12:{s:8:"aperture";s:1:"0";s:6:"credit";s:0:"";s:6:"camera";s:0:"";s:7:"caption";s:0:"";s:17:"created_timestamp";s:1:"0";s:9:"copyright";s:0:"";s:12:"focal_length";s:1:"0";s:3:"iso";s:1:"0";s:13:"shutter_speed";s:1:"0";s:5:"title";s:0:"";s:11:"orientation";s:1:"0";s:8:"keywords";a:0:{}}}
Note that the meta_value for the _wp_attachment_metadata key is just a serialized PHP array:
Array
(
    [width] => 1000
    [height] => 1000
    [file] => 2019/03/WordPress.png
    [sizes] => Array
        (
            [thumbnail] => Array
                (
                    [file] => WordPress-150x150.png
                    [width] => 150
                    [height] => 150
                    [mime-type] => image/png
                )

            [medium] => Array
                (
                    [file] => WordPress-300x300.png
                    [width] => 300
                    [height] => 300
                    [mime-type] => image/png
                )

            [medium_large] => Array
                (
                    [file] => WordPress-768x768.png
                    [width] => 768
                    [height] => 768
                    [mime-type] => image/png
                )

        )

    [image_meta] => Array
        (
            [aperture] => 0
            [credit] =>
            [camera] =>
            [caption] =>
            [created_timestamp] => 0
            [copyright] =>
            [focal_length] => 0
            [iso] => 0
            [shutter_speed] => 0
            [title] =>
            [orientation] => 0
            [keywords] => Array
                (
                )

        )

)
Prefixing meta_key values with a _ protects them from being manually tampered with via the default Custom Fields key-value interface.
So to summarize:
- All content classes (even the built-in post, page, attachment, revision, and nav_menu_item ones) are instances of post; hence the name Custom Post Types for new content classes
- Content object references are stored in wp_posts; related metadata, including custom field data, are stored in wp_postmeta
- Complex fields, such as the Featured Image, are a combination of custom post types, like attachment, and custom metadata stored in wp_postmeta
The above gives us an intuition for implementing custom fields without using any third party plugins.
Adding complex fields to WordPress post types
Knowing that a post type's custom properties are stored in wp_postmeta, we can use WordPress's built-in add_meta_box and update_post_meta functions to add and save complex field types. We can use WordPress's comprehensive hooks to call these functions when an admin screen is rendered and saved. Specifically, we will hook into the admin_init and save_post events, using the built-in add_action function, which hooks a function to an event.
function add_post_meta_boxes() {
// see https://developer.wordpress.org/reference/functions/add_meta_box for a full explanation of each property
add_meta_box(
"post_metadata_advertising_category", // div id containing rendered fields
"Advertising Category", // section heading displayed as text
"post_meta_box_advertising_category", // callback function to render fields
"acme_product", // name of post type on which to render fields
"side", // location on the screen
"low" // placement priority
);
}
add_action( "admin_init", "add_post_meta_boxes" );
function save_post_meta_boxes(){
global $post;
if ( defined( 'DOING_AUTOSAVE' ) && DOING_AUTOSAVE ) {
return;
}
if ( get_post_status( $post->ID ) === 'auto-draft' ) {
return;
}
update_post_meta( $post->ID, "_post_advertising_category", sanitize_text_field( $_POST[ "_post_advertising_category" ] ) );
update_post_meta( $post->ID, "_post_advertising_html", sanitize_text_field( $_POST[ "_post_advertising_html" ] ) );
}
add_action( 'save_post', 'save_post_meta_boxes' );
function post_meta_box_advertising_category(){
global $post;
$custom = get_post_custom( $post->ID );
$advertisingCategory = $custom[ "_post_advertising_category" ][ 0 ];
$advertisingHtml = $custom[ "_post_advertising_html" ][ 0 ];
wp_editor(
htmlspecialchars_decode( $advertisingHtml ),
'_post_advertising_html',
$settings = array(
'textarea_name' => '_post_advertising_html',
)
);
switch ( $advertisingCategory ) {
case 'internal':
$internalSelected = "selected";
break;
case 'external':
$externalSelected = "selected";
break;
case 'mixed':
$mixedSelected = "selected";
break;
}
echo "<br>";
echo "<select name=\"_post_advertising_category\">";
echo " <option value=\"internal\" $internalSelected>Internal</option>";
echo " <option value=\"external\" $externalSelected>External</option>";
echo " <option value=\"mixed\" $mixedSelected>Mixed</option>";
echo "</select>";
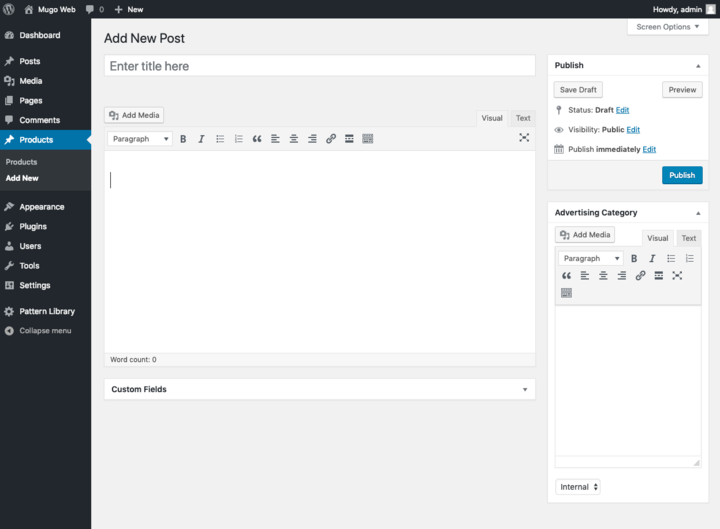
}In the example above, we're displaying two fields in our meta box, a select box and a WordPress WYSIWYG editor. The select box is a form element and the browser handles user interaction. The WordPress WYSIWYG editor is generated using the wp_editor function, which automatically includes all the necessary form elements and JavaScript to handle user interaction. That being said, we could choose to display our fields however we want, say in the form of a colorpicker or datepicker. The only caveats are that we need to:
- include all of the HTML and JavaScript necessary for user interaction
- include one or more form elements to store state data
- dynamically set the value of form elements so they correctly reflect the state
Because we've hooked into the save_post event, the value of our form elements will be posted to our save_post_meta_boxes function where we can parse and store them in the wp_postmeta table using WordPress's update_post_meta function.
And that's really all there is to it. Now if we view our custom post type, we'll see the WYSIWYG editor and select box in the sidebar. If we add some text, select an option, and save our post, these data will persist across page loads because they're saved and loaded from the wp_postmeta table.
Accessing the field values in templates is trivial:
$postAdvertisingCategory = get_post_meta( $post->ID, '_post_advertising_category')[0];
echo "<h1>$postAdvertisingCategory</h1>";
Of course, in a production solution we'd use a dedicated plugin or child theme, untangle application logic from display elements, sanitize inputs, and use dedicated render functions. But the general approach would remain the same!
Are you ready to take your WordPress site to the next level? Say hello!